
Native ESP32 Toolchain Setup
In this Post we will set up the Native Compiler and toolchains in our Linux Host machine to program theESP32-DevKitC V4board . After the Setup we will run 2 example codes
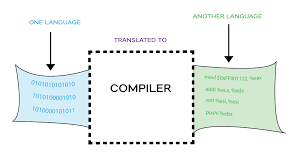
We will use the ESP-IDF which stands for Espressif IOT development Framework.
- The SDK is built upon freeRTOS.
- It provides ESP mcu Specific standard APIs so that you can easily develop your application.
- The SDK also permits you to use the standard freeRtos API to design your application . So all the freeRtos terminologies are valid for your application too.
- The SDK provides a linux kernel-like menuconfig to include different libraries and set different configuration options. You will need to use the following type of cmd-line gui to configure different things
Other options
ESP32-DevkitC is an AWS-qualified development board. In Addition to espressif’s own ESP-IDF SDK , one can use many other Frameworks like
- Amazon freeRTOS which provides out of the box connectivity with AWS IoT, AWS Greengrass and other AWS services
- Platform IO
- Arduino SDK
- MicroPython
Install prerequisites
$ sudo apt-get install git wget libncurses-dev flex bison gperf python python-pip python-setuptools python-serial python-click python-cryptography python-future python-pyparsing python-pyelftools cmake ninja-build ccache
Esp-idf Download & install
~/$ mkdir esp && cd esp
~/esp$ git clone --recursive https://github.com/espressif/esp-idf.git
~/esp/esp-idf$ ./install.sh
Initialize environment
~/esp$ . /home/hassin/esp/esp-idf/export.sh
Start with Example projects
The Sdk includes a wide variety of exampleshttps://github.com/espressif/esp-idf/tree/master/examples
- Each example is a standalone project.
- The examples do not have to be inside the esp-idf directory. You can copy an example directory to anywhere on your computer in order to make a copy that you can modify and work with.
- The IDF_PATH environment variable is the only thing that connects the example to the rest of ESP-IDF.
Compilation
We will first run the basic hello world exampleexamples/get-started/hello_world**
- This example prints the chip information , delays a little & then restarts
Let’s copy the example to the root path of the esp directory
~/esp$ cp -r $IDF_PATH/examples/get-started/hello_world/ .
insert esp32 over USB
check the mounted device For example in Ubuntu if there is no other USB module connected other than the ESP devkit then you will find it mounted at /dev/ttyUSB0 . Use one of the following commands to check
~/$ ls /dev/ | grep 'tty'

~/$ ls /dev/ttyUSB/*
check python version, it should be python2
hassin@hassin-HP:~$ python --version

Python 2.7.15+
Configure:run the configuration utility
~/esp/hello_world$ idf.py menuconfig
It will open up a linux kernel configuration like utility in the terminal
Go To Serial Flasher Config options and change the Port number according to the one populated at your OS (check Above)

Save and exit
Build & Flash
Use idf tools to flash. These were automatically installed while ESP-IDF toolchain setup
~/esp/hello_world$ idf.py build
~/esp/hello_world$ idf.py -p /dev/ttyUSB0 flash
~/esp/hello_world$ idf.py -p /dev/ttyUSB0 monitor
The Following kind of output will be shown
I (269) heap_init: At 40089844 len 000167BC (89 KiB): IRAM
I (275) cpu_start: Pro cpu start user code
I (294) spi_flash: detected chip: generic
I (294) spi_flash: flash io: dio
W (294) spi_flash: Detected size(4096k) larger than the size in the binary image header(2048k). Using the size in the binary image header.
I (305) cpu_start: Starting scheduler on PRO CPU.
I (0) cpu_start: Starting scheduler on APP CPU.
Hello world!
This is ESP32 chip with 2 CPU cores, WiFi/BT/BLE, silicon revision 1, 2MB external flash
[note: The option flash automatically builds and flashes the project]
UseCTRL+] to exit
Here a (W)arning is shown related to flash size, Actually the board has 4MB flash but the configuration file had 2MB size settings So to Solve this we reopen configuration using the menuconfig
~/esp/hello_world$ idf.py menuconfig
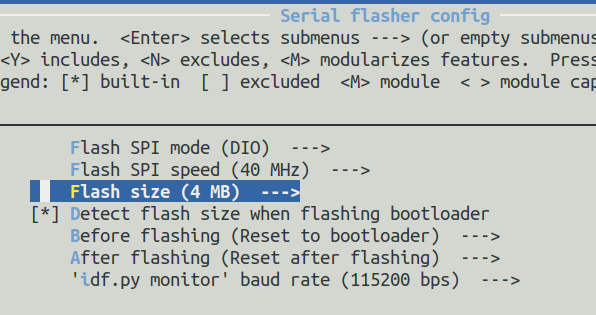
After setting the flash size as 4MB and rebuild and flashing the warning from the debug log disappeared
$ idf.py -p /dev/ttyUSB0 flash monitor
Next up we will test the blink example examples/get-started/blink
In my Board GPIO2 is connected to the onboard LED, so I had to modify the example like the following code snippet.
uint8_t gpio[] = {2};
uint8_t i = 0;

void app_main(void)
{
    gpio_pad_select_gpio(gpio[i]);
    gpio_set_direction(gpio[i], GPIO_MODE_OUTPUT);
	printf("Turning off the LED %d\n", gpio[i]);

    gpio_set_level(gpio[i], 0);
    vTaskDelay(1000 / portTICK_PERIOD_MS);

	printf("Turning on the LED %d\n", gpio[i]);
    gpio_set_level(gpio[i], 1);
    vTaskDelay(1000 / portTICK_PERIOD_MS);

    i++;
    if(i == sizeof(gpio)/sizeof(uint8_t)){i = 0;}
}
Note You can also use the project configuration menu to choose which GPIO to blink
Here vTaskDelay() : is a freeRtos delay function
Ref :https://docs.espressif.com/projects/esp-idf/en/latest/get-started/index.html#introduction